Antique Furniture Hardware
 If you’ve ever inherited a beautiful piece of furniture or even scored a diamond in the rough on the side of the road or at an antique shop, you know how exciting it can be to consider the possibilities. For one thing, you have the opportunity to update it to suit your style and breathe new life into it with, more often than not, very little effort.
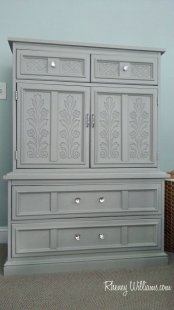
Many times, all you need is a fresh coat of paint and new hardware. But what about that prohibiting predicament when you have original hardware holes that make retrofitting modern hardware all but impossible? Take my hand-me-down bedroom furniture below, for example.
When my husband and I purchased our first home last summer, I revamped the bedroom furniture that we inherited from my in-laws by painting it a smoky gray color and had to settle for silver plating the original handles and pulls when I absolutely could not find hardware to fit the existing holes.
But in keeping with my DIY philosophy: When I can’t find what I want, I make it! And since the hardware I selected doesn’t fit the holes I have, I’ll just make new holes. Fortunately, creating new hardware holes in beautiful wood furniture is an easier and less involved project than you might think.
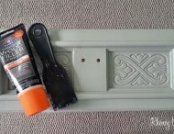
You need paintable wood filler and a scraping tool.
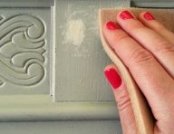
Roll the tube around in your palms for a couple of minutes to warm it up (trust me, it definitely makes squeezing it out easier!) and insert a glob (technical terms only, please) into the holes.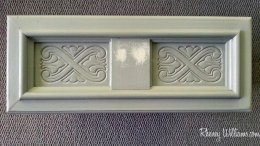 Use the scraper to remove the excess filler and allow the filler to dry.
Because you are filling entire holes and not cracks or gouges, don’t try to fill the entire hole in one application. Instead, create a base with the first round of filler, allow it to dry thoroughly and build on top of that in several successive fillings.
After filling the holes, I lightly sanded the surface using a 320 sanding sponge. And yes, that’s my vacuum cleaner hose attachment on the floor: Keeping my vacuum at the ready to suck up any sawdust allowed me to do all of the work in my bedroom without having to lug all of the drawers up and down the stairs.
Wipe away the dust and paint the newly smooth surface.
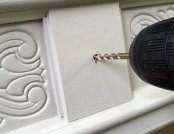
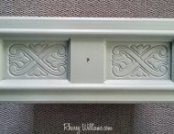
I knew I only needed one hole for my selected drawer knobs so I located the direct center of the panel and used my 3/16 drill bit and created a brand new hardware hole.